the windows that will appear in the hall of the bank room set are also of vital importance as the pillars are, therefore there will need to be of a similar design but will also need to be striking and eye-catching.
these are the designs that I have originally been given by Ben and will be the main designs that I will be working of to model the windows:
from these designs I can see that these are going to be a challenge to create as the designs are very precise and intricate and my most important challenge is getting all of the windows to have a different design to the next so that o two are the same.
With this in mind, these are the initial models that I went about creating:
I am incredibly pleased with these as I think that I managed to capture the designs that I was originally given to make an effective designs that will not only be striking in their own right but will also tie in well with the pillars to make the beginnings of a brilliant set.
Monday, 25 November 2013
Pillars, Pillars, and more Pillars ....
One of the most important components to the bank room set will be the pillars that run down both sides of either side of the hall, before you reach the bank vault room.
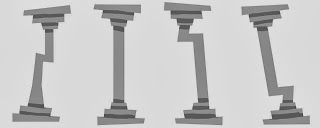
The most important element to the pillars will be to keep the stylised 50's cut-out design that will be the running theme throughout the film. Ben has given me these designs so that my models will fit to this theme:
with these designs in mind, I have started some initial models:
I started by keeping the models fairly simple:
I then added some more detail around the top and bottom sections:
I am very pleased with this final design as it looks very stylised and effective but also is a fairly simple design and will not take too much attention away from the main action of the scene.
The most important element to the pillars will be to keep the stylised 50's cut-out design that will be the running theme throughout the film. Ben has given me these designs so that my models will fit to this theme:
with these designs in mind, I have started some initial models:
I started by keeping the models fairly simple:
I then added some more detail around the top and bottom sections:
We felt that this made the model look to fussy, so we decided to keep it simple to thin the top and bottom sections down as they looked a bit to chunky. I also added some more detail to the middle section of the pillars:
I am very pleased with this final design as it looks very stylised and effective but also is a fairly simple design and will not take too much attention away from the main action of the scene.
Wednesday, 13 November 2013
a possible prop...
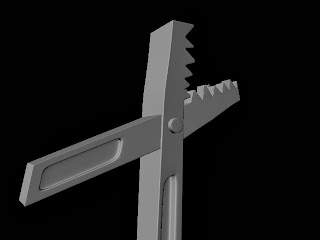
one of the other possible props for the two characters to use to break into the bank vault that we thought about using was some crocodile clips. these would work well as they are a different type of tool compared to the others that could be used in lots of very different creative ways.
This was the initial design that I was given by ben:

This was the initial design that I was given by ben:

from this design, I then created a model:
I think that the design is clean and relatively simple, but we may have problems when it comes to rigging and animating the wire.
extrior props modelling:
There are several different objects that are integral to making our exterior set a believable representation of a 1950's American street. two of the more detailed and important objects are an Ariel for the tops of buildings and a billboard advertising a typical film of the time.
These were the two initial designs that I was given by Ben:
From these two designs I then did my first initial design of the billboard:
this model turned out exactly as I wanted it to and fits very closely to the design that I was originally given and it also fits to the skewed design style of the rest of the film.
I then went on to model the ariel. I decided to create the ariel in two different ways:
first, I decided to model it in a traditional 3d fashion and made the sections of the ariel as they would be on a real one. for my second model, I made it in a flatter more 2d style. this was because I thought that if it is going to be high up and quite far away on a building it may not be clearly visible, so by making the whole model flat, it would be easier to see and understand.
these are the two models that I created:
By making the ariel two different ways, it will be easier for us to decide which will fit in better when the scene is complete.
Tuesday, 12 November 2013
modelling the dustbin:
One of the props that is required for the outside set is an object that everyone will be guaranteed to see almost every time they leave the house, a dustbin. the main requirements that I was given in relation to the general design of the bin was that it needed to look aged and as if it had been kicked around and dented, as illustrated by bens design that he gave me to use:
From this, I then did my first initial model for the dustbin:
Overall, I was not very pleased with this design, as I felt that it did not fully fit to the requirements of the design and was too fussy and had very complicated topology. to resolve this issue, I decided to create some more blueprints with a simpler, yet more stylised feel to it:
I was much happier with this design as I feel that it is much simpler with clean lines, but still has a very stylised feel and look to it. from these I then created my second model of the dustbin:
I am much happier with this design as I feel that it is a much more concise and simple model that is both striking and unique in its design.
Subscribe to:
Comments (Atom)


